

Are you tired of the same old boring nail colors and designs? Do you want to add some creativity and flair to your nails? Look no further than creating your own nail art! Not only is it a fun and creative way to express yourself, but it also allows you to save money by doing it yourself.
In this article, we'll provide you with tips and tricks on how to create beautiful and unique nail art designs right from the comfort of your own home. From polka dots to floral designs, we'll cover a variety of techniques that are easy to learn and execute. So grab your nail polish and let's get started on creating your very own masterpiece!
Getting Started
Gather necessary materials
Before you start creating your own nail art, you need to make sure you have all the necessary materials. First and foremost, you'll need a variety of nail polish colors. Whether you prefer bright and bold hues or more subdued shades, having a range of colors will allow you to create endless combinations and designs.
In addition to nail polish, you'll also need specific tools for nail art. This includes brushes of different sizes for detailed designs, dotting tools for creating polka dots and other shapes, and striping tape for clean lines. These tools can be found at most beauty supply stores and online retailers.
Lastly, don't forget about other materials that can add some extra pizzazz to your nail art. Glitter, rhinestones, and stickers can all be used to create unique and eye-catching designs.
By gathering all the necessary materials, you'll be able to create your own nail art without any limits. So let's get started on the path to creating beautiful and personalized nail art designs!
Prep your nails
Before diving into the world of nail art, it's important to properly prep your nails. This ensures that your nail art looks its best and lasts as long as possible.
The first step in prepping your nails is to remove any old nail polish. This can be done using regular nail polish remover and cotton balls. Make sure to remove all of the old polish so that your new design can shine through.
Next, it's time to shape your nails. Using a nail file, shape your nails to your desired length and shape. Whether you prefer short and round nails or long and pointed ones, filing your nails will help create a clean and polished look.
After shaping your nails, it's important to apply a base coat. This not only protects your nails from potential staining or damage from the nail polish, but also helps the nail polish adhere better and last longer. Make sure to let the base coat dry completely before moving on to your nail art design.
By properly prepping your nails, you'll be able to create a flawless and long-lasting nail art design. So take the time to properly prep your nails and get ready to show off your personalized and unique nail art designs!
Creative Nail Art Ideas
Polka Dots
Polka dots are a classic and playful nail art design that is easy to do and always looks great.
Here's how to create your own polka dot nail art.
- Start by applying a base coat to your nails and letting it dry completely.
- Choose two contrasting nail polish colors. Using the lighter color, paint your nails as the base color and let it dry completely.
- Next, using a dotting tool or toothpick, dip it into the darker nail polish color and create small dots all over your nails. Try to keep the dots evenly spaced and similar in size.
- Once you've finished adding the dots, let the nail polish dry completely before applying a top coat to seal the design.
- Use a white or light-colored base coat to make the dots pop.
- If you don't have a dotting tool, use a toothpick or the end of a bobby pin as a substitute.
- Make sure the dots are fully dry before applying the top coat to avoid smudging.
- Experiment with different dot sizes and spacing to create unique and personalized designs.

Ombre
Ombre nail art is a trendy and elegant design that creates a gradient effect on your nails.
Here's how to create your own ombre nail art:
- Start by applying a base coat to your nails and letting it dry completely.
- Choose two to three nail polish colors that blend well together. Starting with the lightest color, apply it to the bottom half of your nails and let it dry completely.
- Using a makeup sponge, apply the second color to the bottom half of the sponge and lightly dab it onto the top half of your nails. The two colors should blend together in the middle to create a gradient effect.
- If you're using a third color, repeat the process with a new section of the sponge and apply it to the very tip of your nails.
- Let the nail polish dry completely before applying a top coat to seal the design.
Here are some tips to ensure success with your ombre nail art:
- Use colors that blend well together and have a similar finish (e.g. all cream colors or all metallic colors).
- Use a small makeup sponge or a piece of foam to ensure an even and smooth blend.
- Apply a thin layer of each color to avoid a clumpy or lumpy finish.
- Practice makes perfect - don't be afraid to experiment with different color combinations and blending techniques.

Glitter Gradient
Glitter gradient nail art is a glamorous and sparkly design that is perfect for special occasions or for when you want to add some extra bling to your nails.
Here's how to create your own glitter gradient nail art:
- Start by applying a base coat to your nails and letting it dry completely.
- Choose two nail polish colors - one that matches the glitter and another that will be the base color. Apply the base color to your nails and let it dry completely.
- Using a makeup sponge, apply the glitter nail polish to the very tip of the sponge and lightly dab it onto the top half of your nails. The glitter should become more concentrated towards the tip of your nails, creating a gradient effect.
- Apply additional layers of glitter polish until you achieve your desired level of sparkle.
- Let the nail polish dry completely before applying a top coat to seal the design.
Here are some tips to ensure success with your glitter gradient nail art:
- Choose a glitter nail polish that has a fine texture to avoid a chunky or uneven finish.
- Use a small makeup sponge or a piece of foam to ensure an even and smooth blend.
- Apply a thin layer of each color to avoid a clumpy or lumpy finish.
- To make the glitter gradient more subtle, use a sheer glitter polish or apply the glitter to only the very tip of your nails.

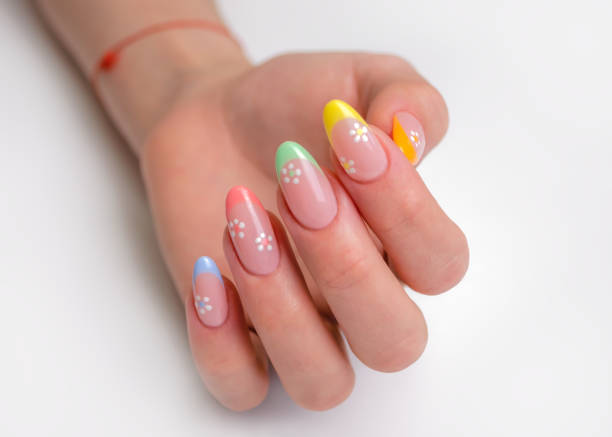
Flora
Floral nail art is a popular design that is perfect for spring and summer, or for when you want to add a touch of nature to your nails.
Here's how to create your own floral nail art:
- Start by applying a base coat to your nails and letting it dry completely.
- Choose two or more nail polish colors that will be the base color and the flower color. Apply the base color to your nails and let it dry completely.
- Using a dotting tool or a toothpick, create small dots in a circular shape with the flower color on top of the base color. These will serve as the center of your flowers.
- Using a thin brush or a toothpick, create petal shapes around the center dots. You can create a variety of flower shapes, such as daisies or roses, by varying the number and shape of the petals.
- Add leaves and stems using a green nail polish and a thin brush or toothpick.
- Let the nail polish dry completely before applying a top coat to seal the design.
Here are some tips to ensure success with your floral nail art:
- Use a variety of nail polish colors to create a more realistic and eye-catching design.
- Practice your flower shapes on a piece of paper or a plastic sheet before attempting the design on your nails.
- Use a small brush or toothpick to create precise and detailed designs.
- Experiment with different flower shapes and color combinations to create a unique and personalized floral nail art design.
Tips for Nail Art Success
Nail art can be a fun and creative way to express yourself, but it can also be frustrating if you don't achieve the desired result. Here are some tips for nail art success:
Practice makes perfect: Like any skill, the more you practice, the better you'll become. Don't get discouraged if your first attempt at nail art doesn't turn out the way you want it to. Keep practicing and trying new techniques until you find what works for you.
- Take your time: Rushing through your nail art can result in mistakes and an uneven finish. Take your time and work slowly and carefully to achieve a polished and professional-looking design.
- Experiment with colors and designs: Don't be afraid to try new color combinations and designs. Nail art is a creative outlet, and the possibilities are endless. Experimenting with different colors and designs can help you discover new techniques and styles.
- Use quality materials: Quality nail polish and tools can make a big difference in the outcome of your nail art. Invest in good quality materials, such as a high-quality top coat and a variety of nail art brushes, to ensure that your nail art looks its best.
- Be patient: Patience is key when it comes to nail art. Allow each layer of nail polish to dry completely before moving on to the next step. Rushing through the process can result in smudges and smears, which can ruin your design
By following these tips, you'll be able to achieve beautiful and professional-looking nail art designs. Remember to have fun and be creative, and don't be afraid to try new techniques and designs. With practice and patience, you'll become a nail art pro in no time!

Conclusion
In conclusion, creating your own nail art can be a fun and rewarding way to express your creativity and personality. With a few basic materials and a little bit of practice, you can achieve stunning and unique nail art designs that are sure to turn heads.
Whether you're a beginner or a seasoned nail art pro, there are a variety of techniques and designs to choose from, such as polka dots, ombre, glitter gradients, and floral designs. Remember to take your time, use quality materials, and be patient as you experiment with different colors and techniques.
By following the tips and techniques outlined in this article, you can achieve beautiful and professional-looking nail art designs that will leave a lasting impression. So why not give it a try and see where your creativity takes you? With a little bit of practice and some imagination, you'll be creating gorgeous nail art designs that will be the envy of everyone around you.